12 KiB
The process for this is similar to the process for forking a github and pushing changes to a repository. It is really nicely outlined here though by another Obsidian user in his modding wiki.
In order to contribute to the wiki, you must have three things:
*nix users, feel free to grab the above applications from your local package manager instead.
We assume for the sake of this document that you already all three of these. We have done what we can to minimize interaction with Git and we will walk you through necessary steps to use it. We also hope that you will very much enjoy using Obsidian.
Fork the Repository
-
Go to the wiki repository
-
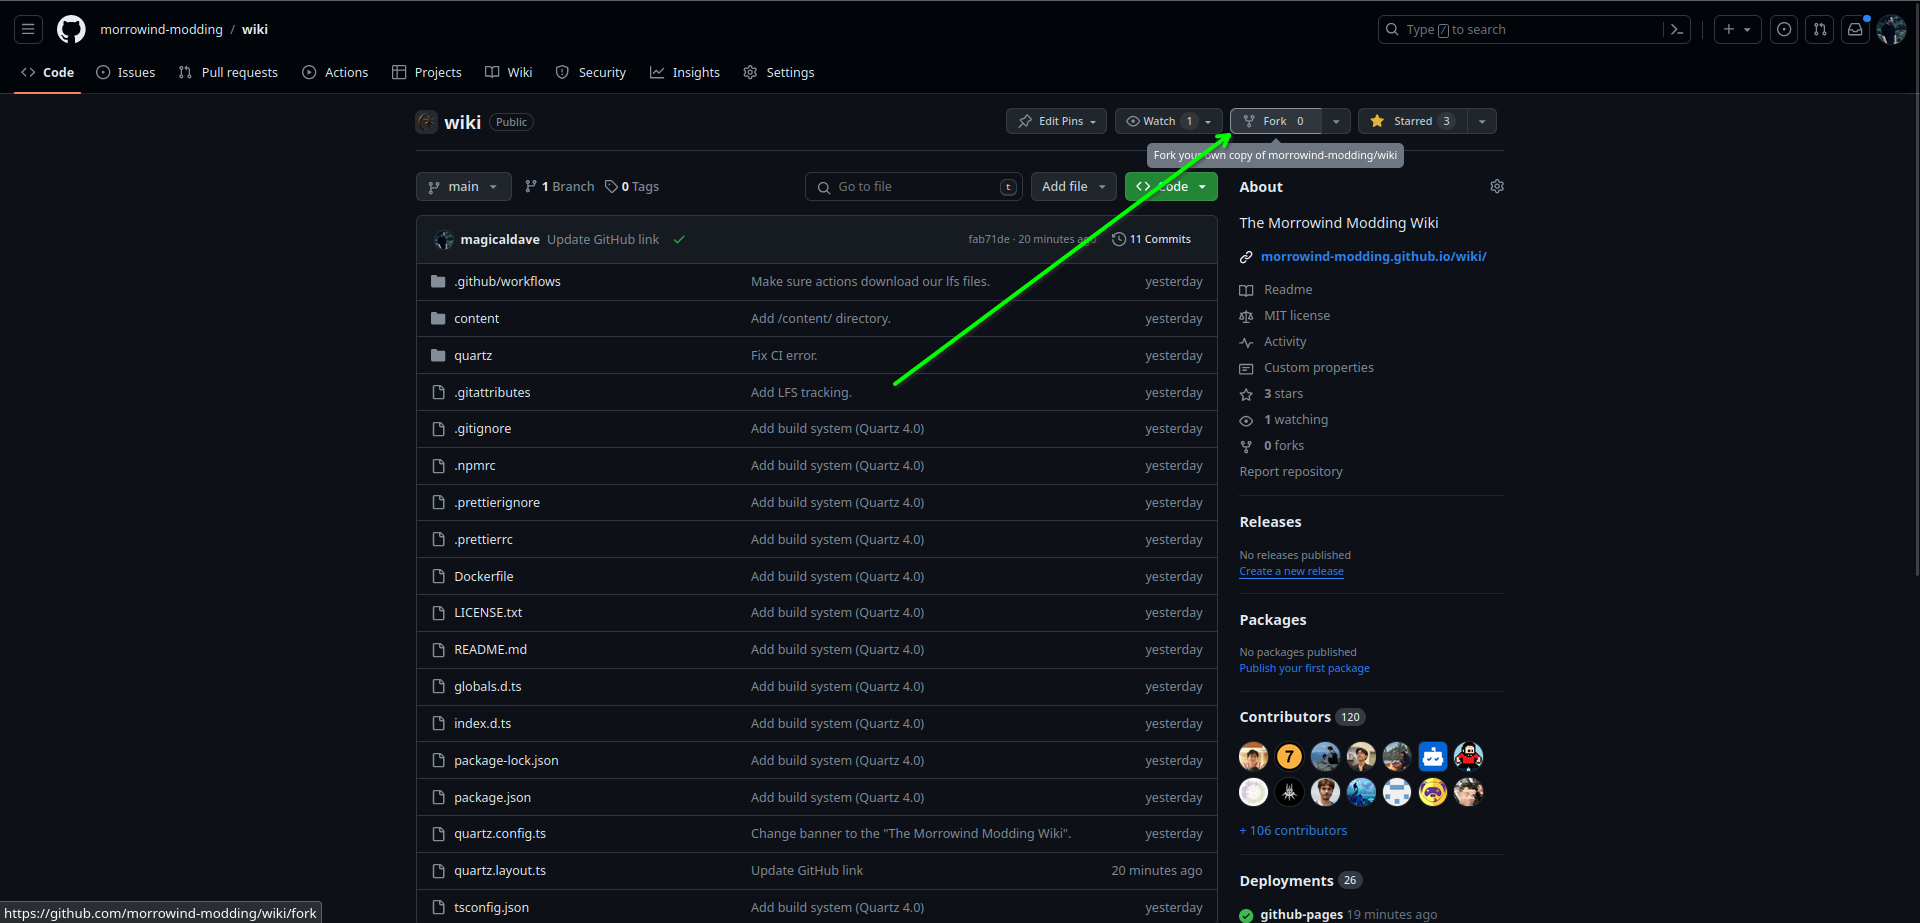
Click
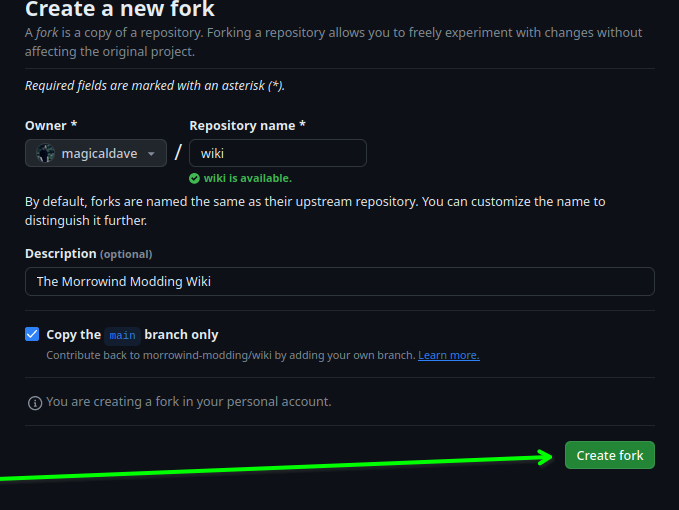
Fork, thenCreate Fork:Now you have your own unique copy of the entire repository which you can change however you like and even rehost. Note that over time the repository may grow to be fairly large.
NOTE: Developers may build the site locally with the following
npmcommand:
npm i
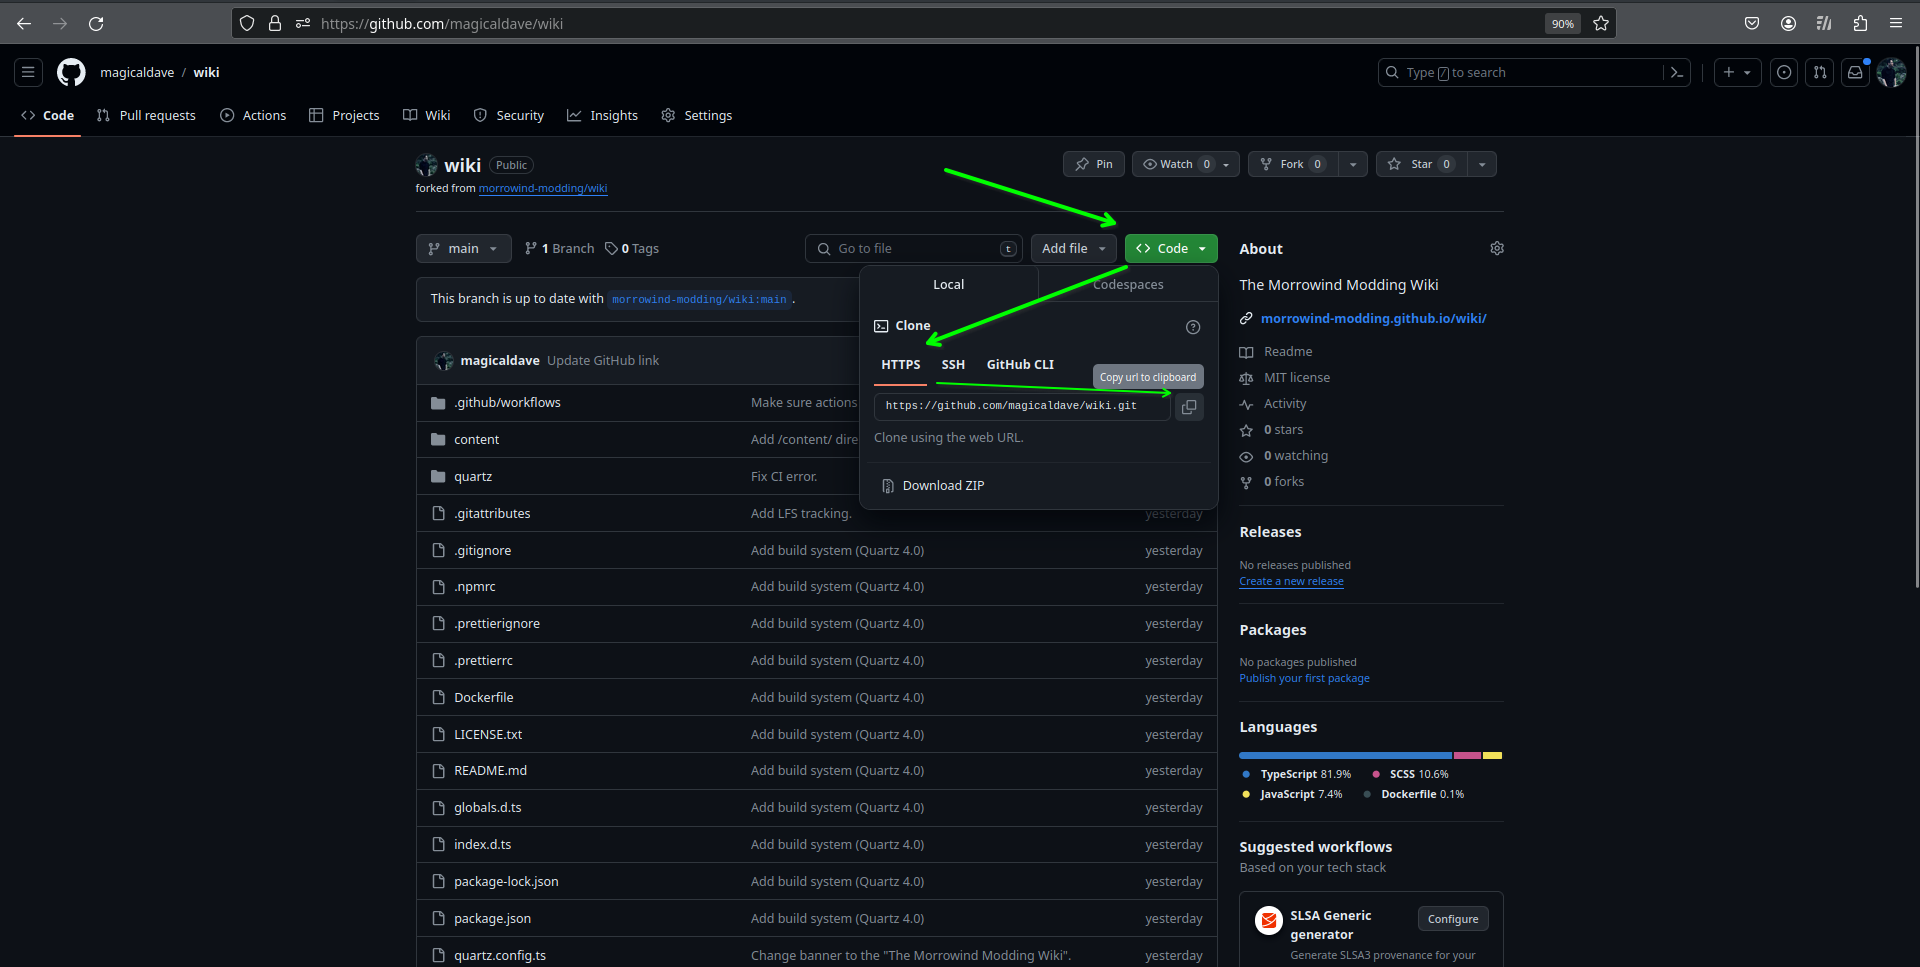
npx quartz build --serveYou will be brought to your newly created copy of the wiki’s github. Get your repo’s url by clicking
Code, thenHTTPS, then the clipboard icon.Stash the URL somewhere safe, as you will need it later. Or, if you simply want a copy of the wiki for your personal Obsidian vault - you’re done!
Get A Personal Access Token
In order to make changes to the wiki’s GitHub through Obsidian, you must give it a special key that says it has permission from you to do so first.
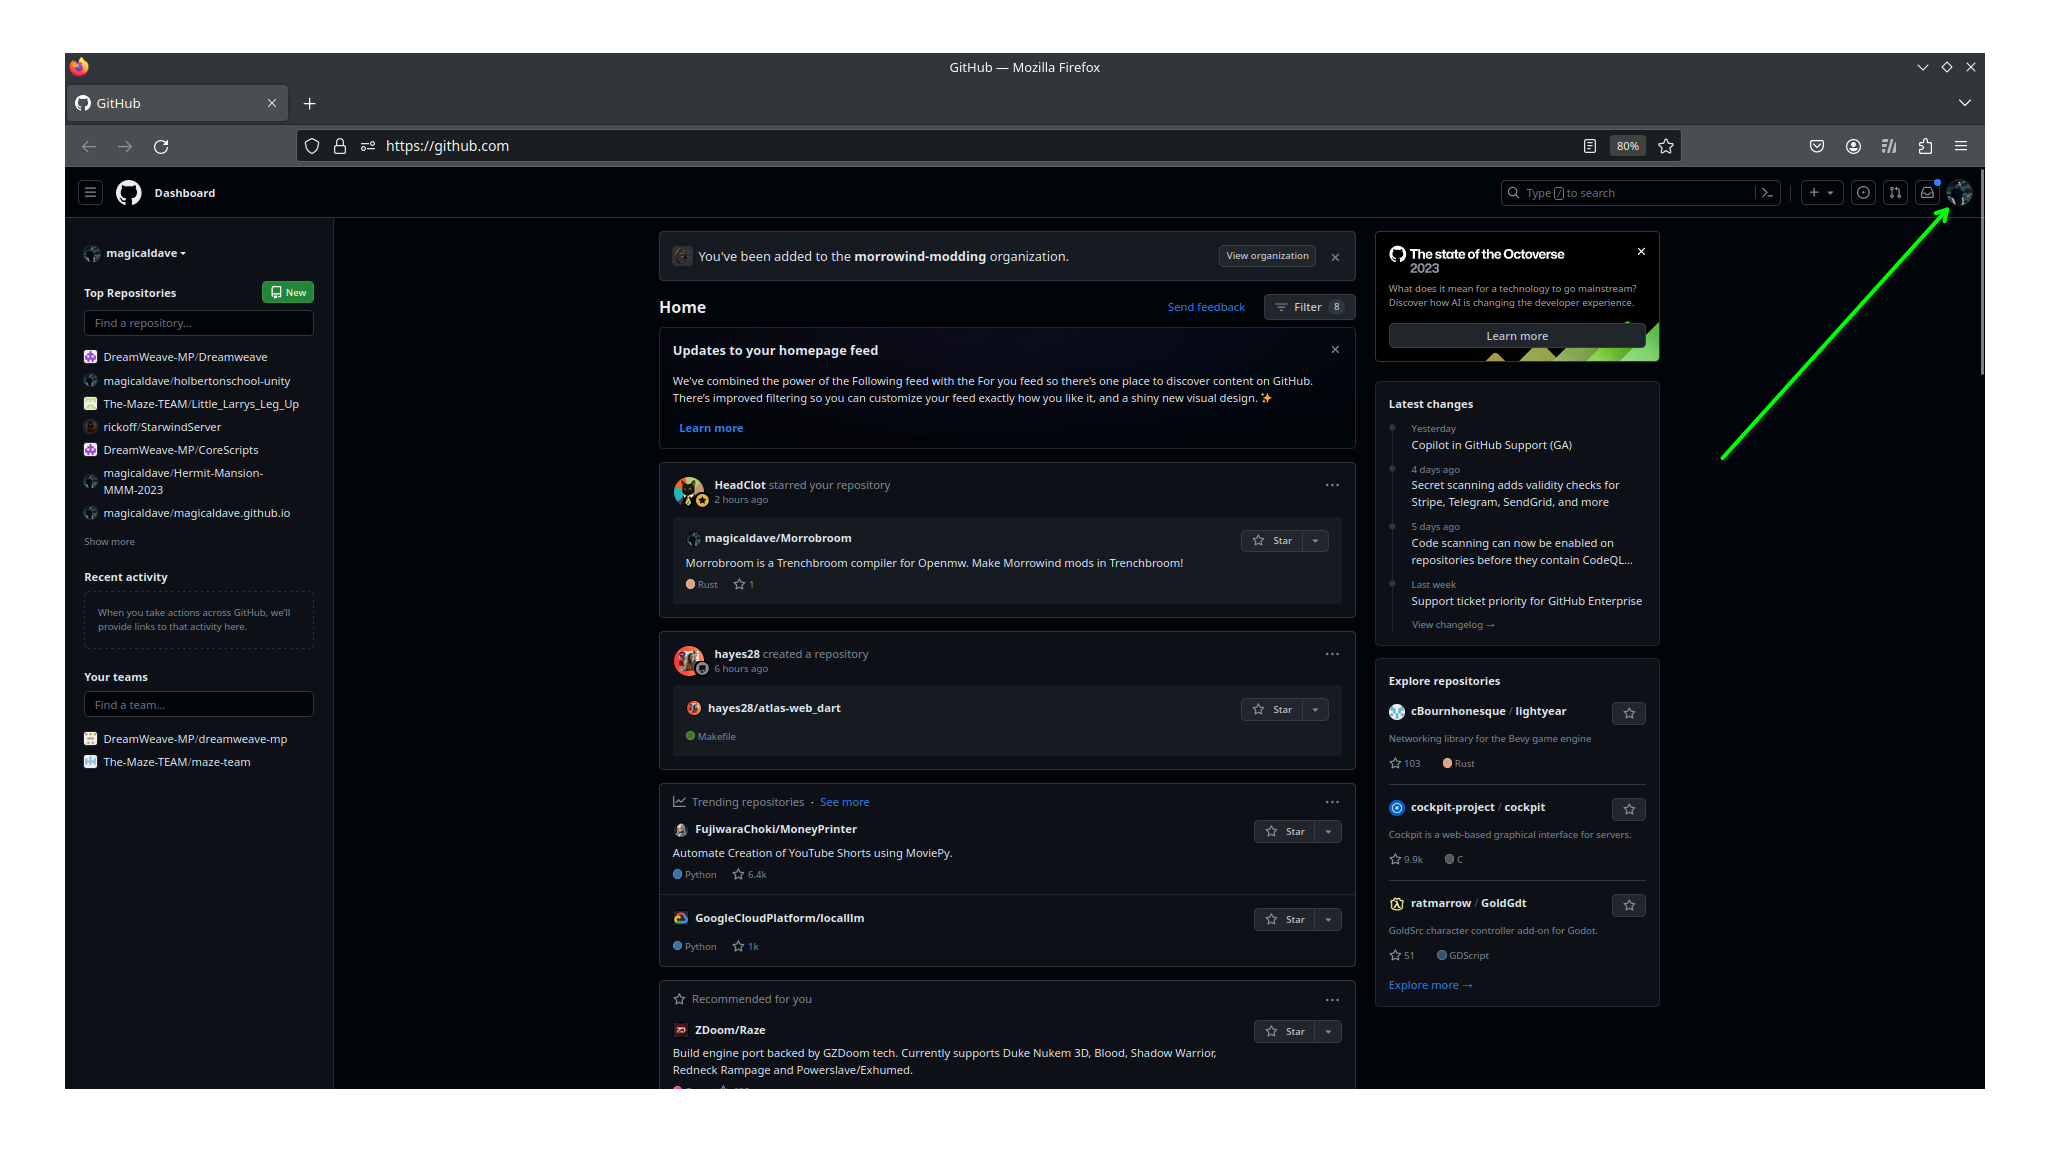
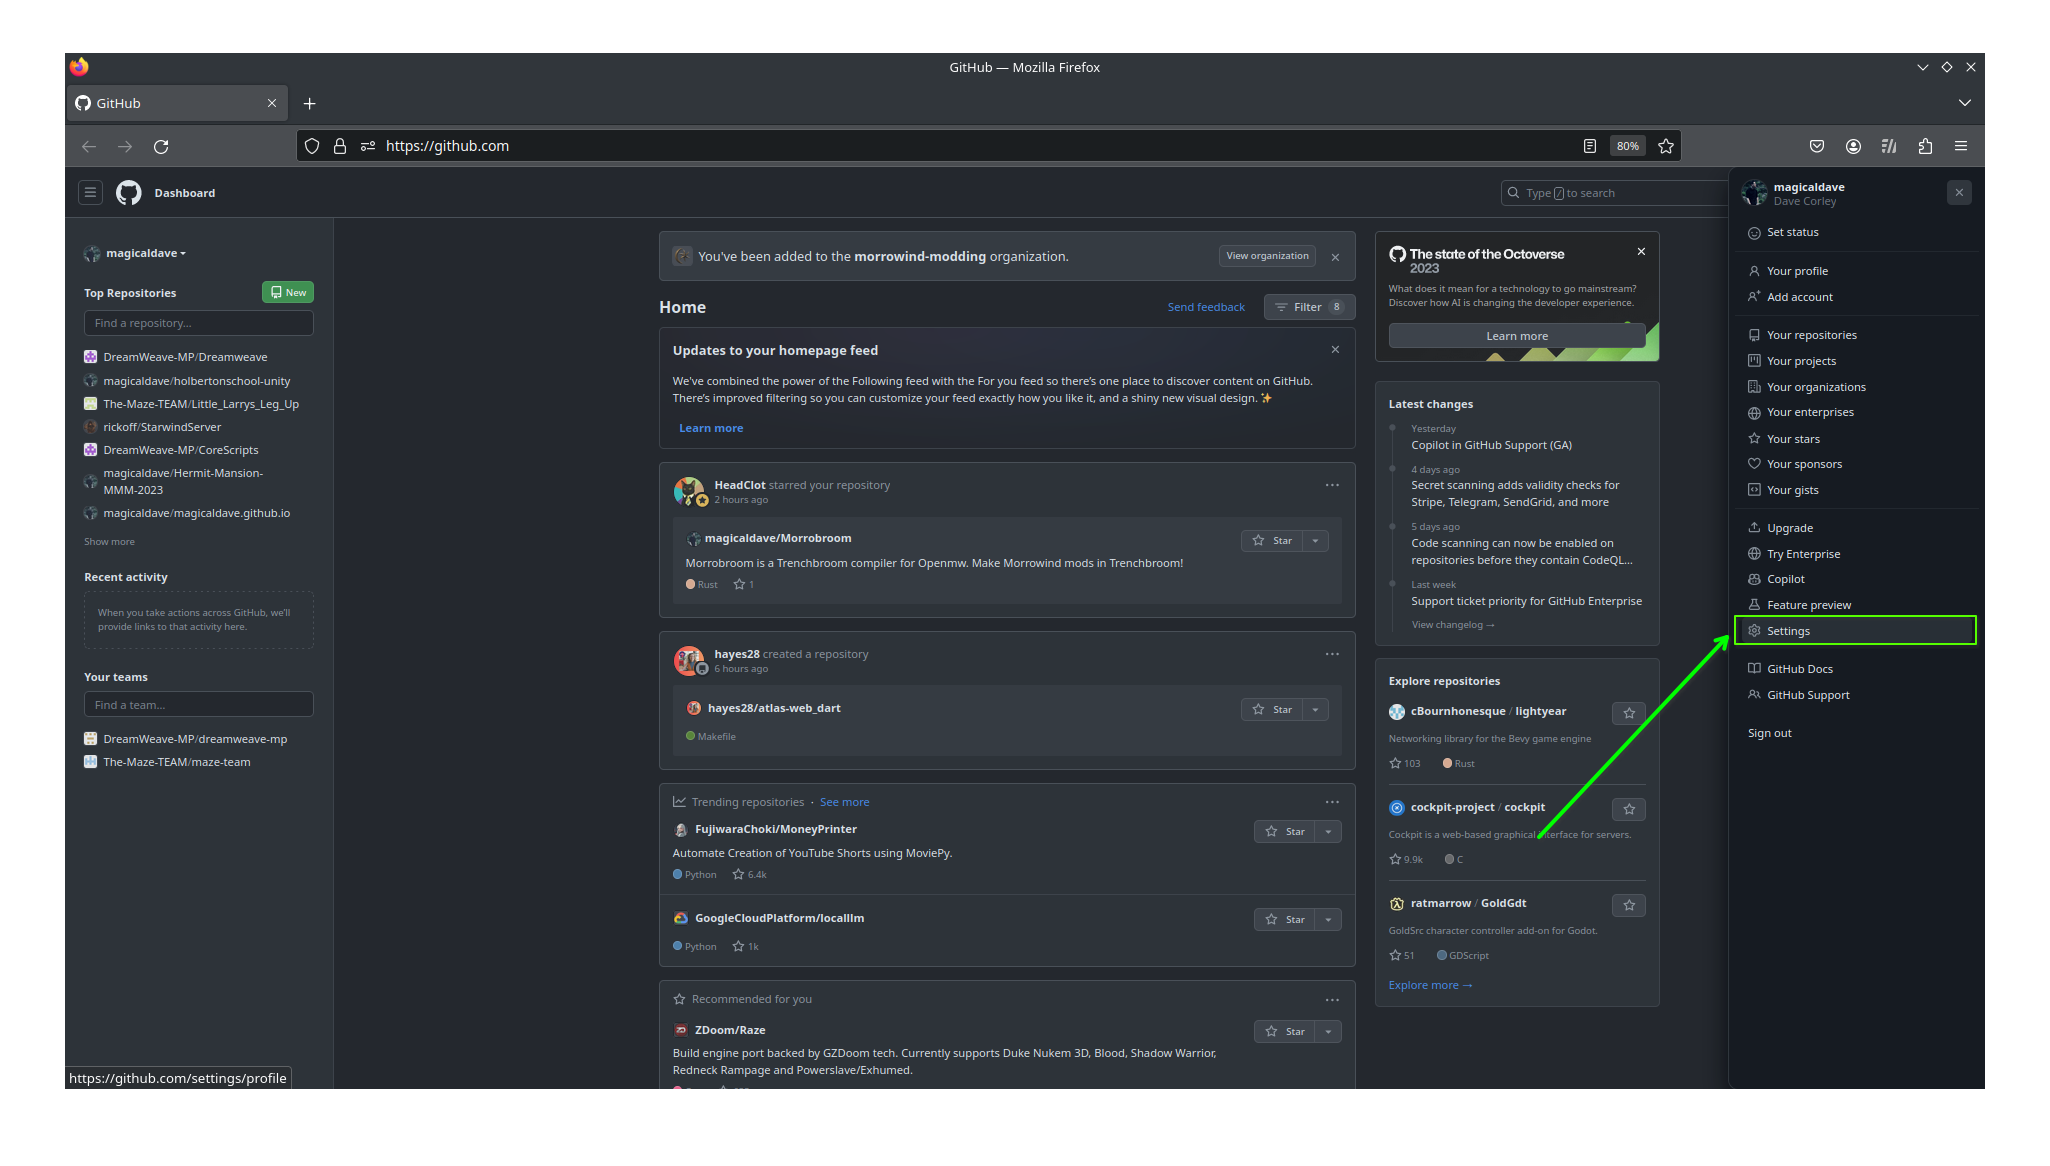
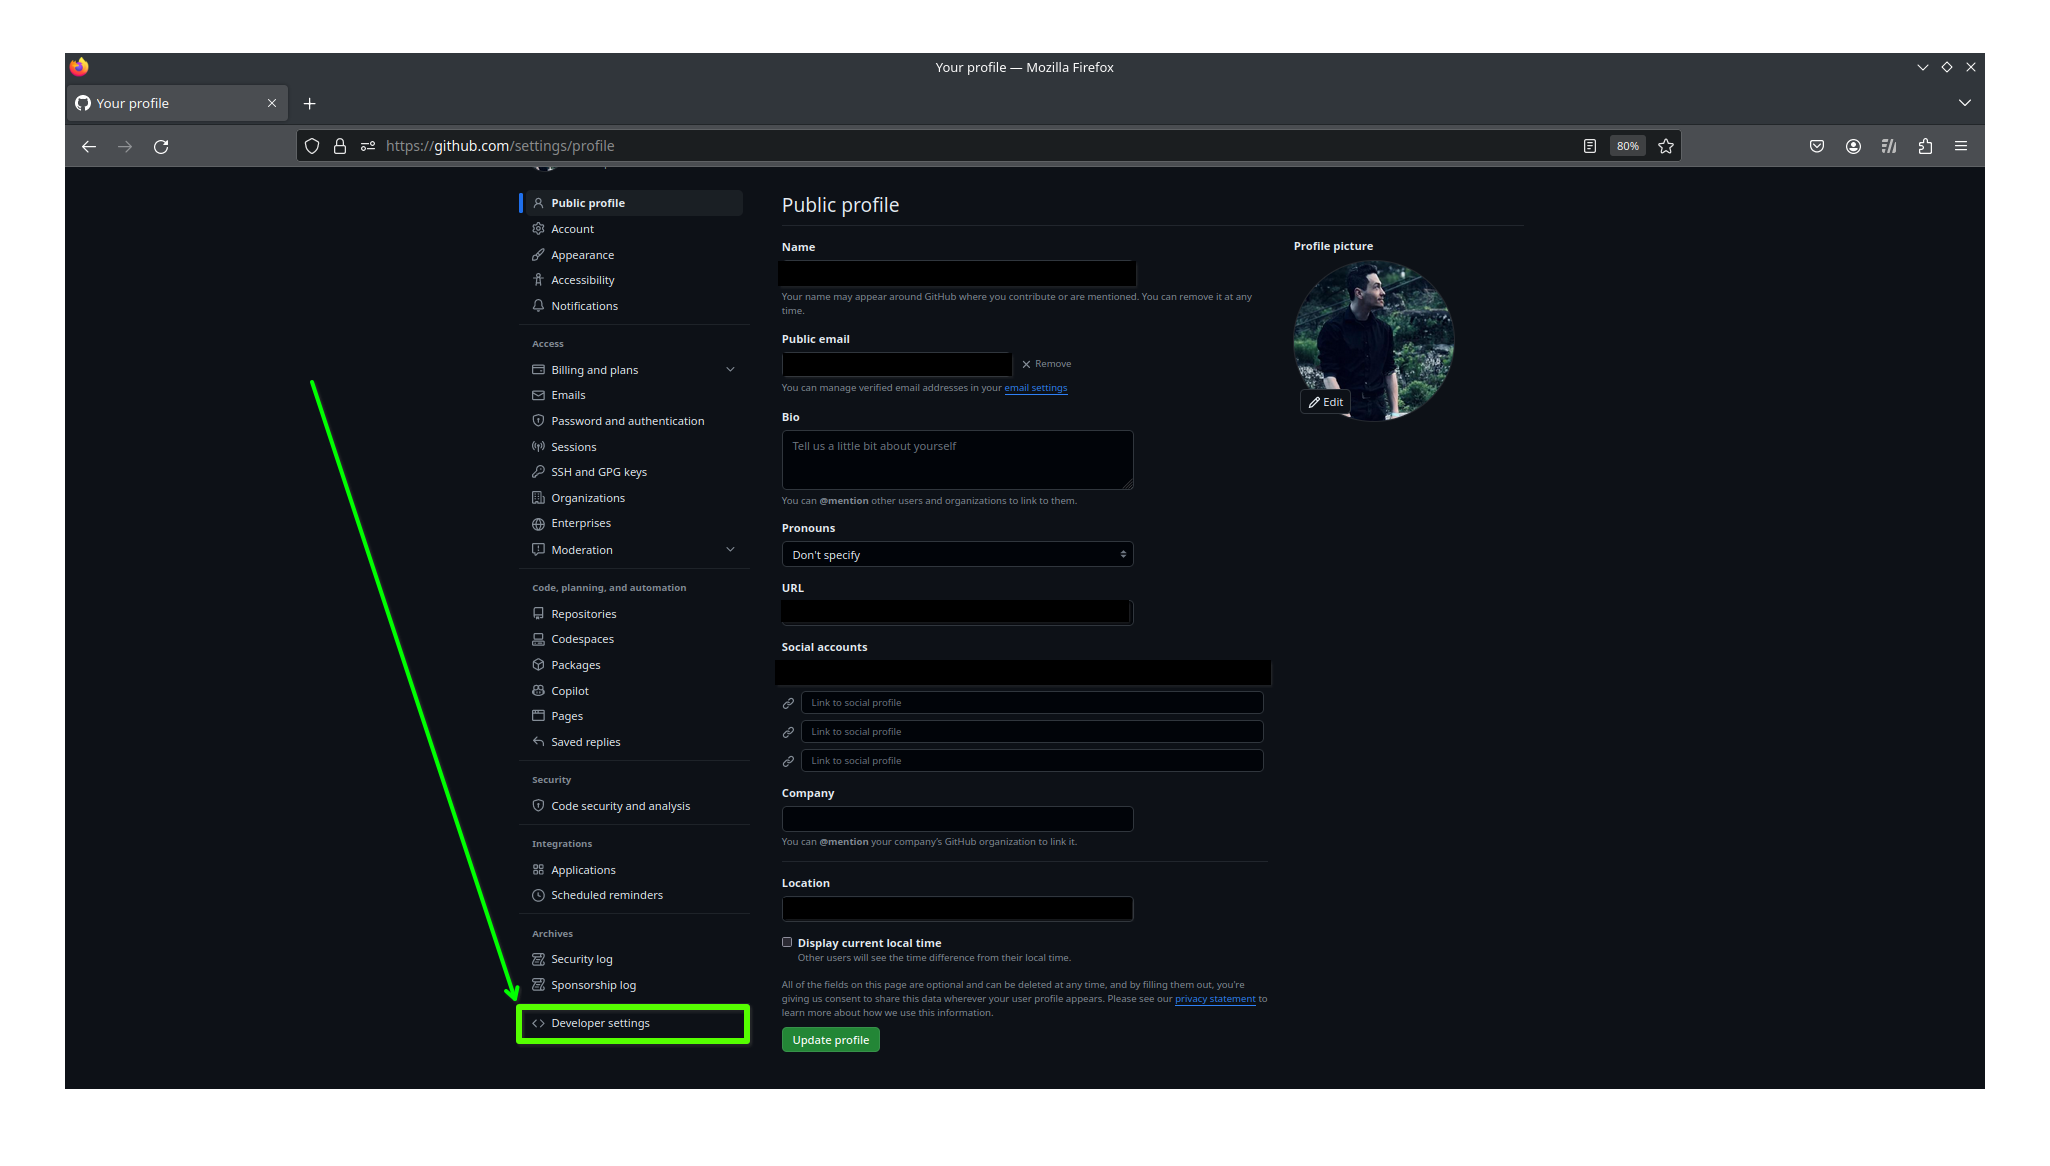
- Log into your Github account and open your profile. Then go to Settings. You can open your profile from any part of the GitHub site by clicking your profile picture in the upper right corner of the page:
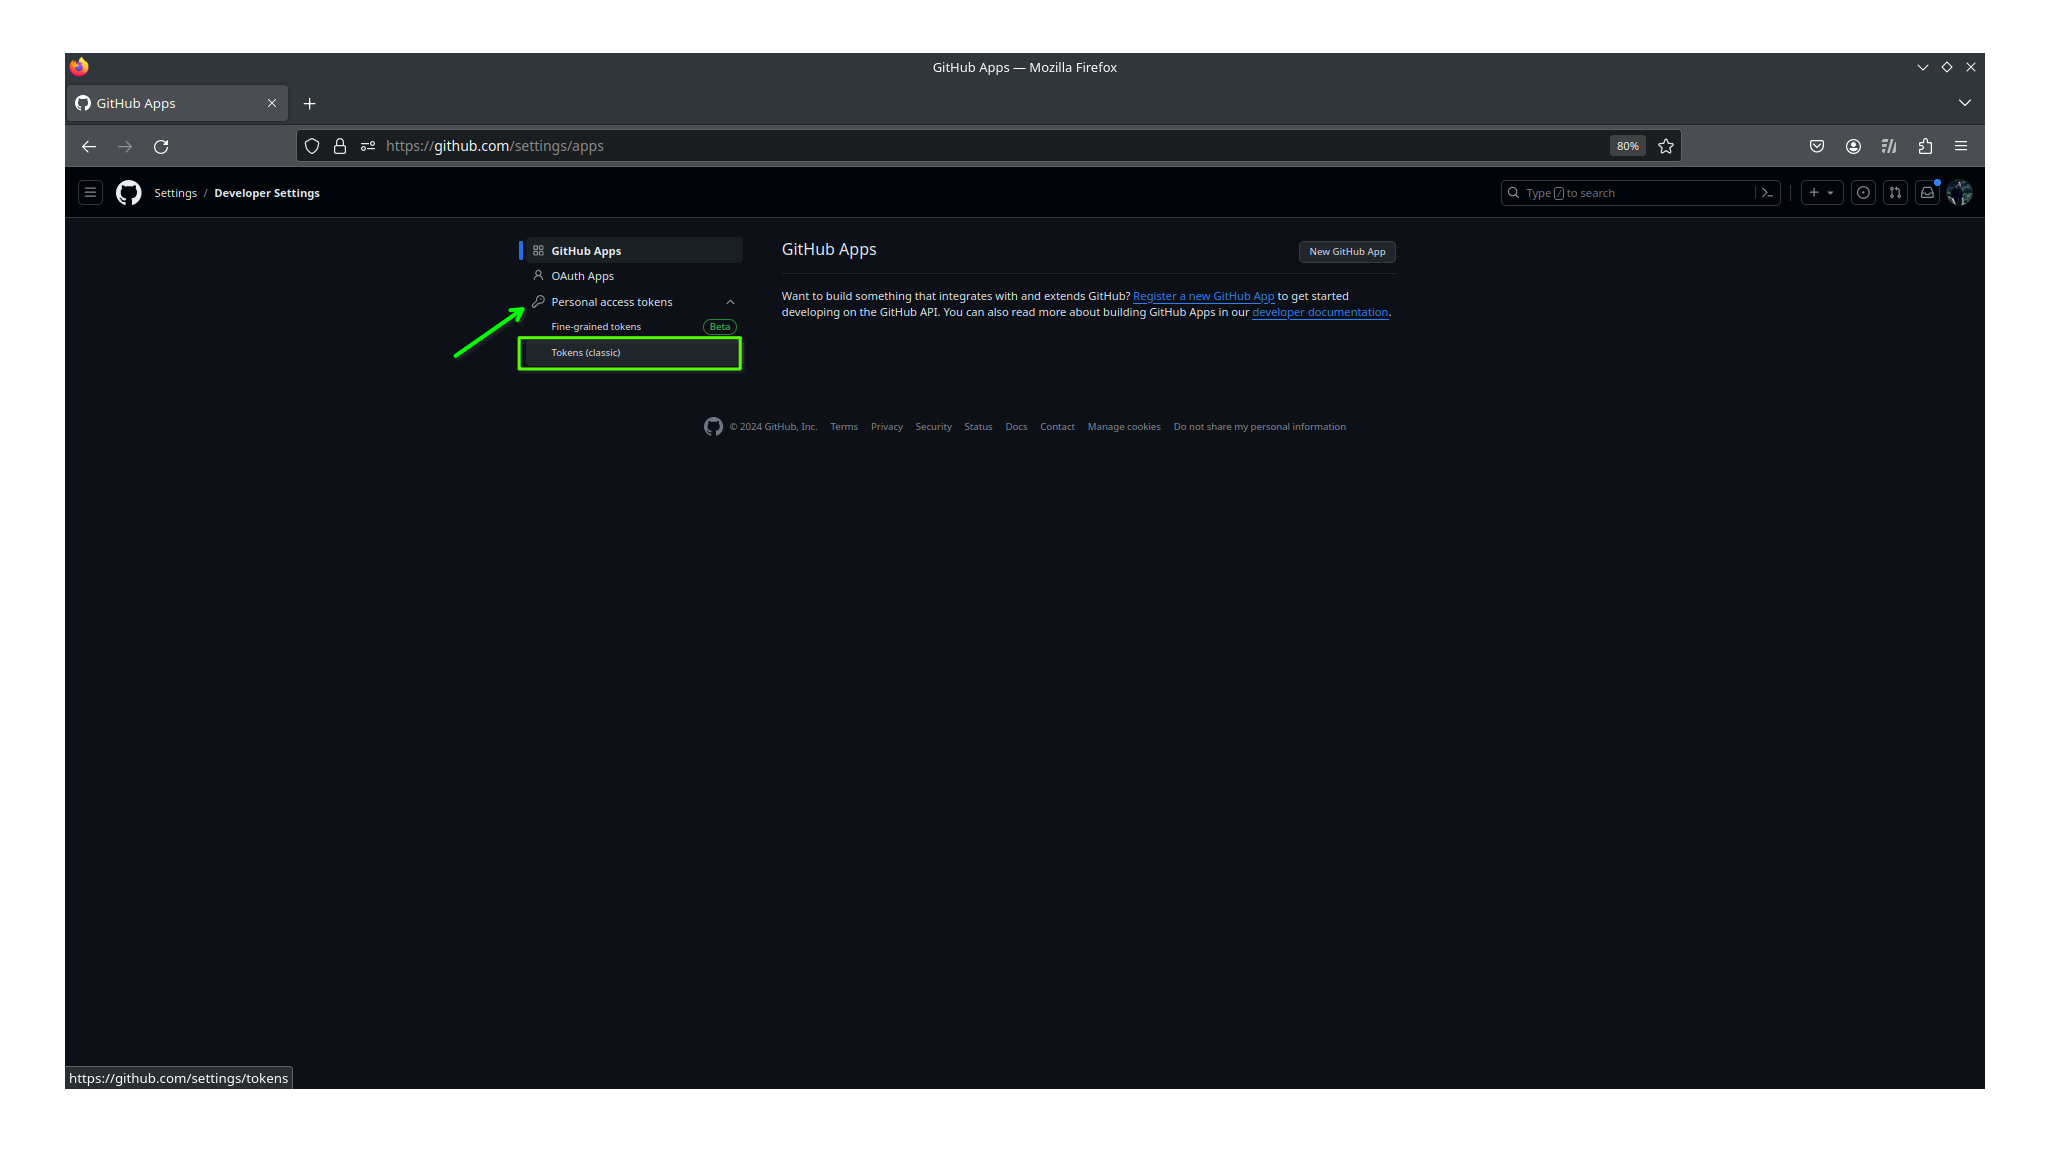
- Go to
developer settings, thenPersonal Access Tokens, and selectToken (Classic):
On this final menu, selectGenerate a Personal Access Token:

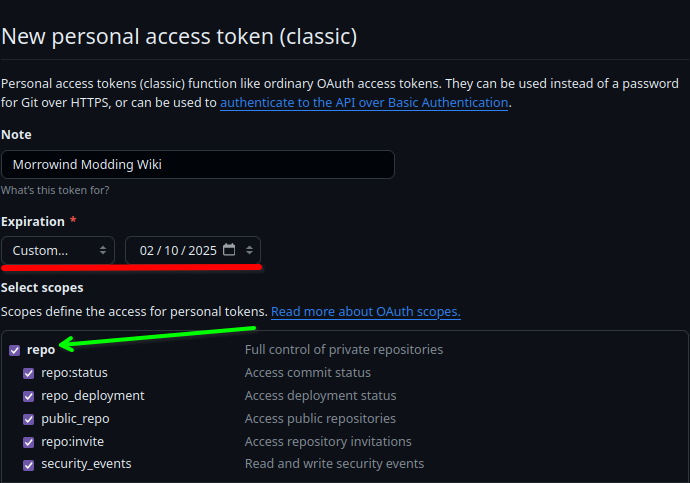
- On this page you name your key and set its expiration date. We recommend doing a
Customexpiration for one year from the date you are creating the key. This is as long as GitHub will allow them to live. Then, make sure to click the checkbox next torepo. Finally, clickGenerate Tokenat the bottom of the page. Please take special note of the fact that you will not be able to see your personal access token again after creating it - leave the page open until you’ve configured Obsidian!
Set Up Obsidian
Install Git for Obsidian
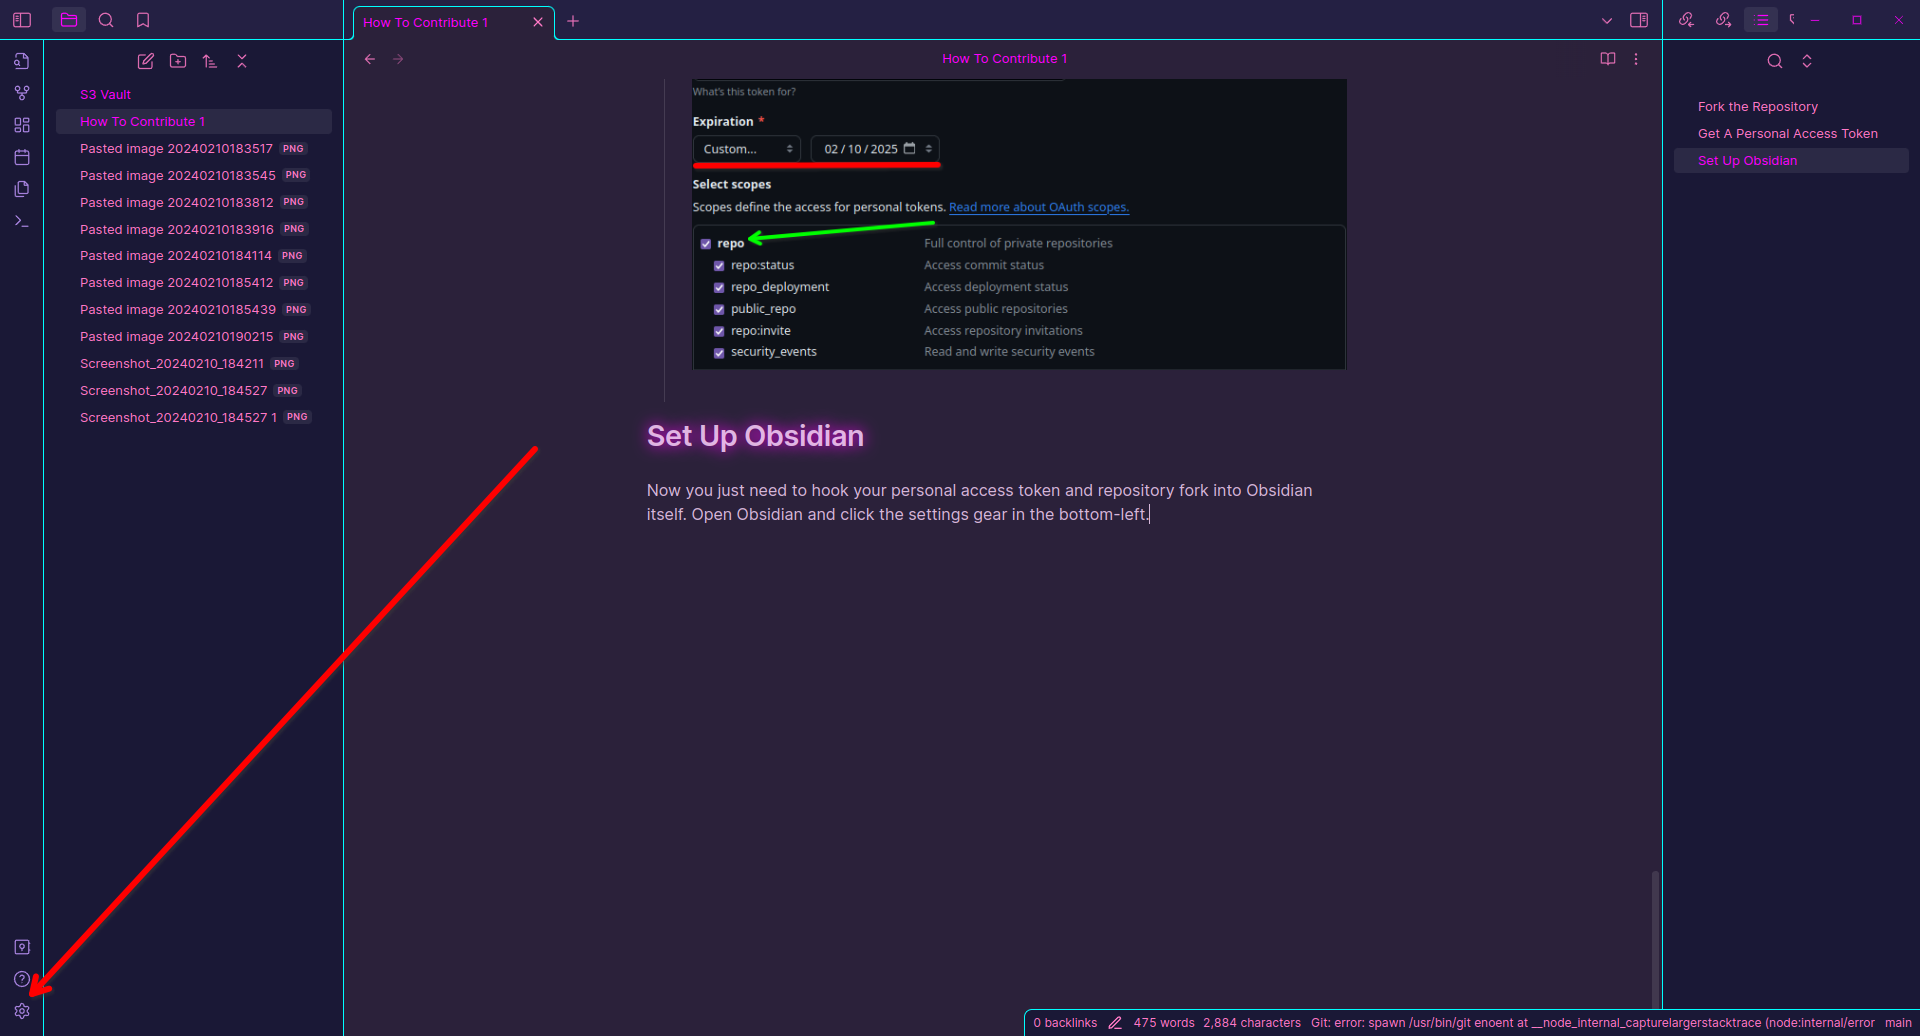
Now you just need to hook your personal access token and repository fork into Obsidian itself.
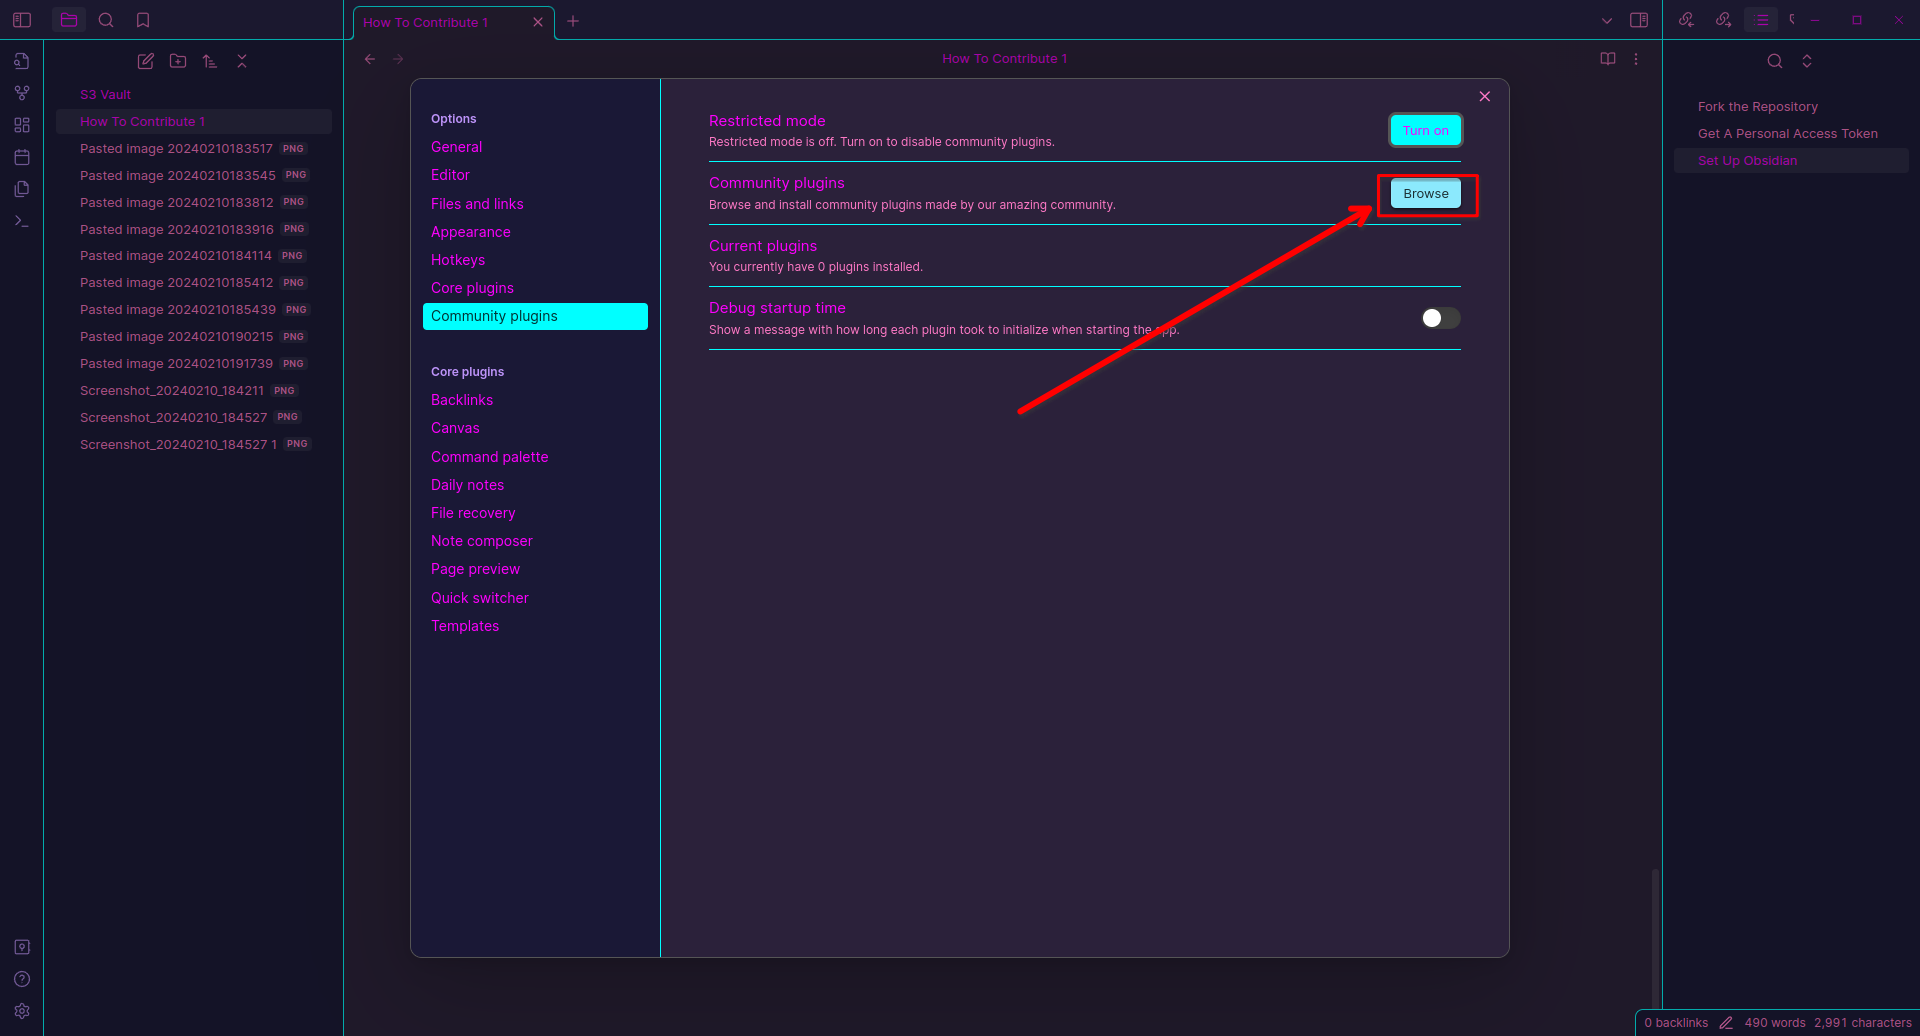
- Open Obsidian and click the settings gear in the bottom-left.
- Go to
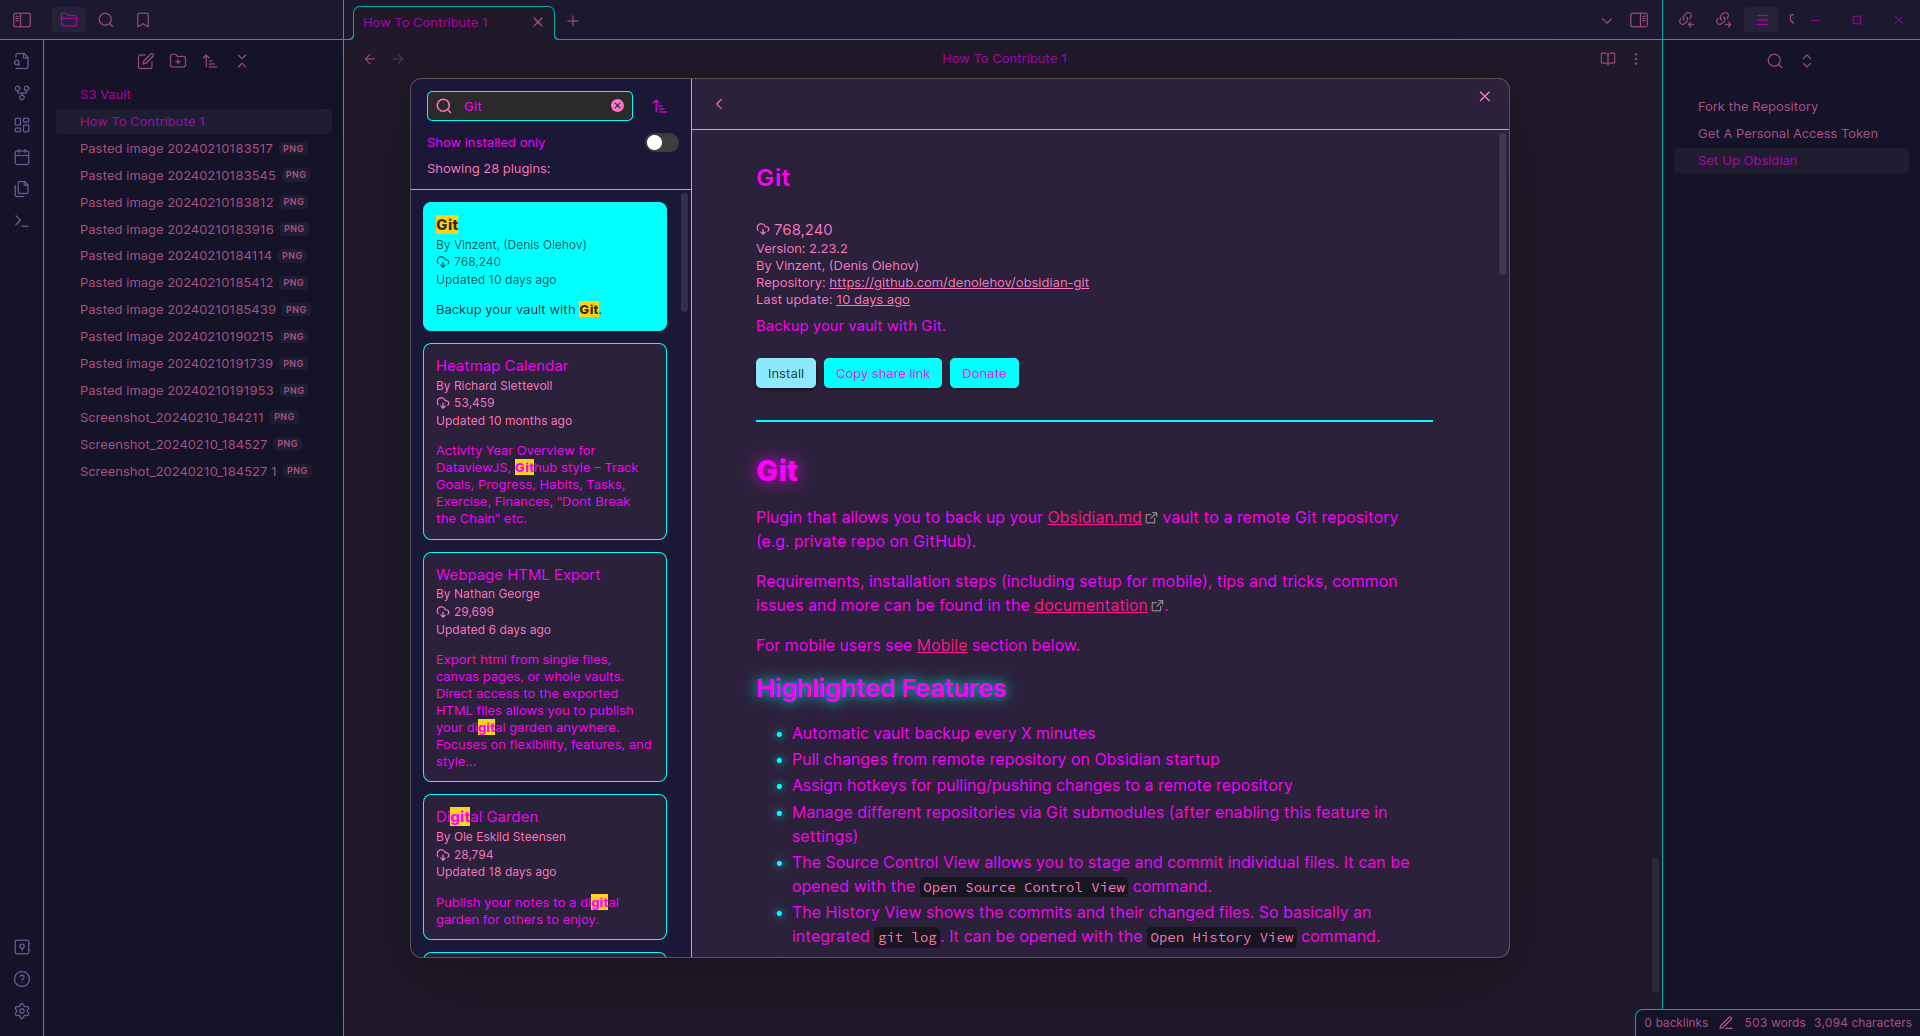
Community Plugins, thenBrowse. Search forGit.
Select the first result, hitInstall, thenEnable.
Clone the Repository
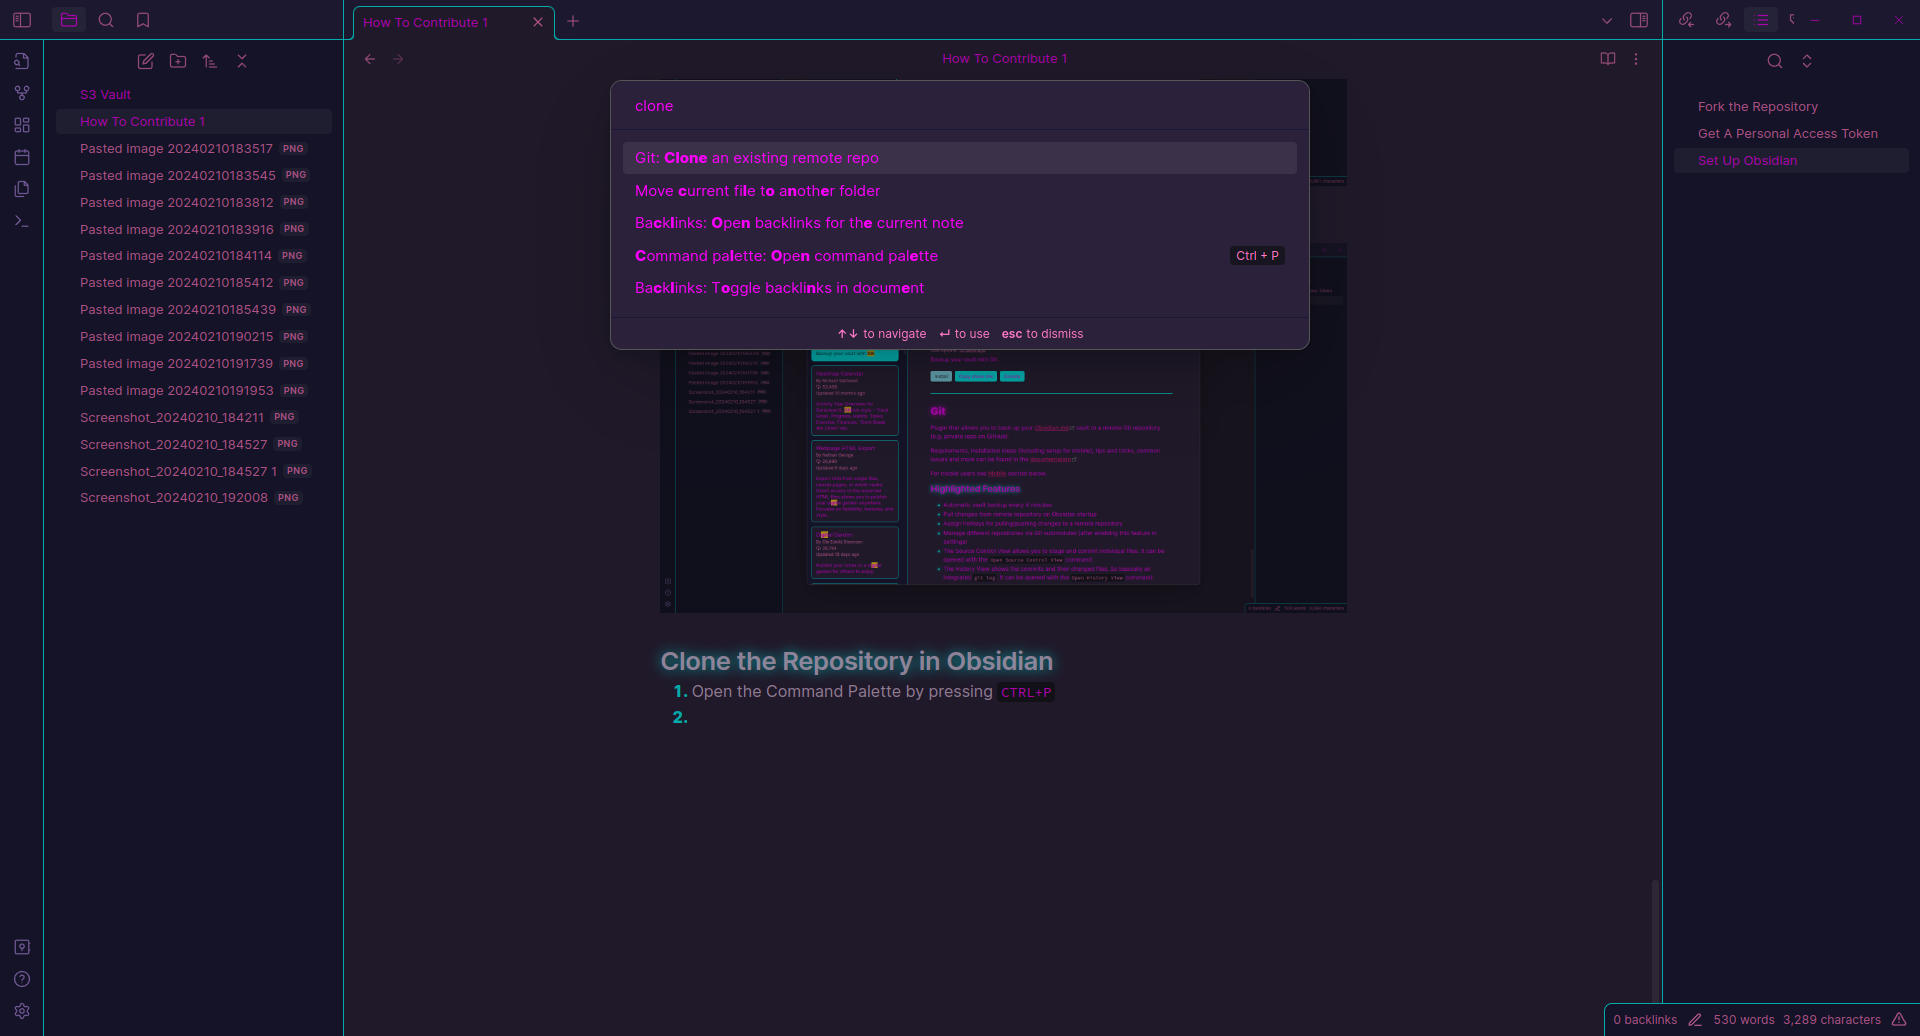
- Open the Command Palette by pressing
CTRL+P - Type in clone, and select
Clone an existing repo
- Paste in your repository URL in the following format:
https://<PERSONAL_ACCESS_TOKEN>@github.com/<USERNAME>/<REPO>.git
Replace<PERSONAL_ACCESS_TOKEN>with your previously generated key, and your username in place of<USERNAME>: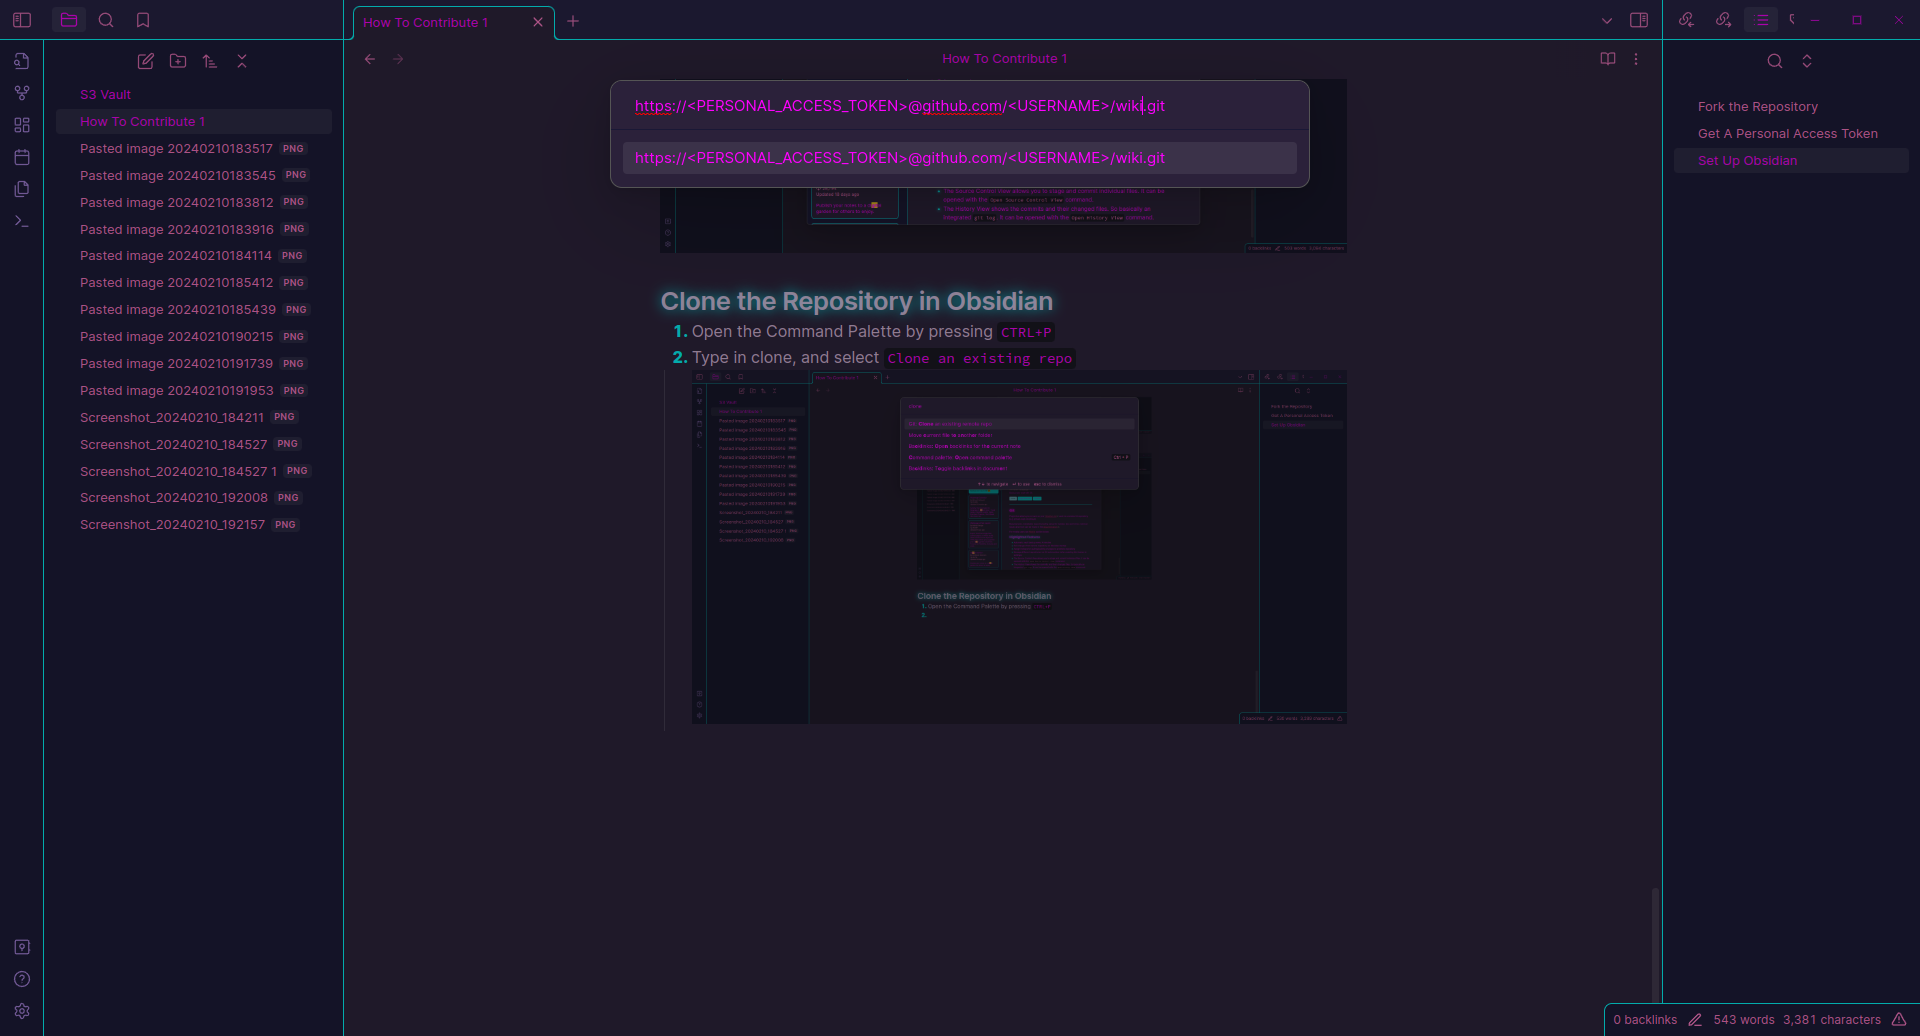
Pick a name for the folder, and leave the second box aboutClone depthblank - simply press enter. Now the wiki is installed inside of obsidian, and you can make edits to your local copy of it. Let’s start by sending over this very document!
Editing Guide
Pick where your document should go first. Most contributor content should go under Guides, but if you’re making edits to a specific project, then use that folder instead. Feel free to create new folders if you feel your document necessitates it.
REQUIREMENTS:
-
Due to compatibility issues with Obsidian and Quartz, only some file types can be accepted. Videos must be in webm format before publication. Any audio which is not directly relevant to the subject of the video clip must be removed as well to limit file sizes. Maintainers can help you with this. You can use something like Simple Screen Recorderor OBS to record your screen with or without audio.
-
Morrowind-specific file types such as
nif,dds, andesmwill not directly be recognized by Obsidian and can’t be opened as notes. They will, however, appear in your source control view and can be added to links in your documents.-
For example, if your asset is a texture in:
Assets/Animation/Simple Texture Animation in Blender, then you make a link to it in your document like this:
-
-
Submissions should be tagged with the tools used and subject covered. See existing guides for exmples. To add a tag, simply use an octothorpe
#and the name of the tag.blender orCSSE are existing tags which you may use, but feel free to make up any that are relevant.
Basic Folder Structure
- Guides – Umbrella Heading
- Concept – a landing page summarizing the concept – e.g., Textures
- Sub-Concepts – elaborating on specific parts of a concept – e.g., AI Upscaling
- Tutorials – e.g., Upscaling a texture with Gigapixel AI
- Programs and Tools – Umbrella Heading
- (Tool Type) – landing page for categories of tools – e.g., 3D Modelling
- (Program Name) – e.g., Blender
- (Tool Type) – landing page for categories of tools – e.g., 3D Modelling
- Projects – Umbrella Heading
- (Project Name) – *Summary page about the project
- (Structure from here could vary depending on the project)
- (Project Name) – *Summary page about the project
- Contributing to Morrowind Modmaking Wiki
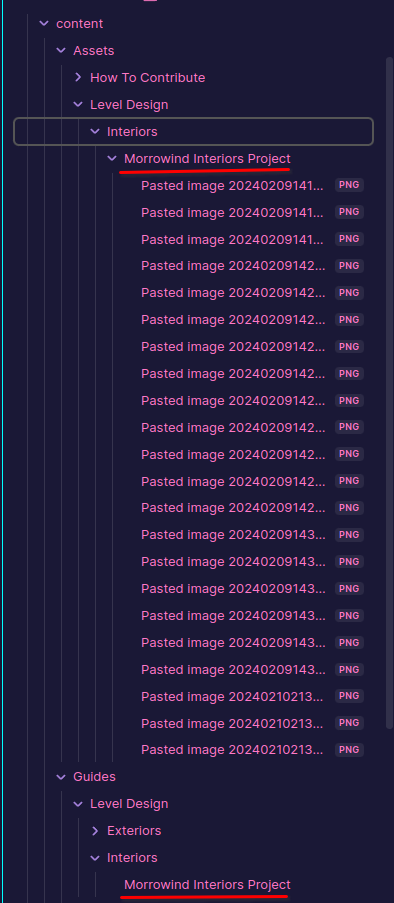
Text documents should be placed at the author’s discretion, with any assets (ESM, DDS, pictures, videos, etc) placed inside of a corresponding folder under Assets. See the Morrowind Interiors Project guide for an example:
You can drag any files your document depends on right into Obsidian and place them into this folder. This helps keep the wiki easy to navigate.
Send It Home
Once you’re done editing:
- Make sure the right sidebar is open
- Select the source control view (if it’s not visible you may need to drag the sidebar a bit further out)
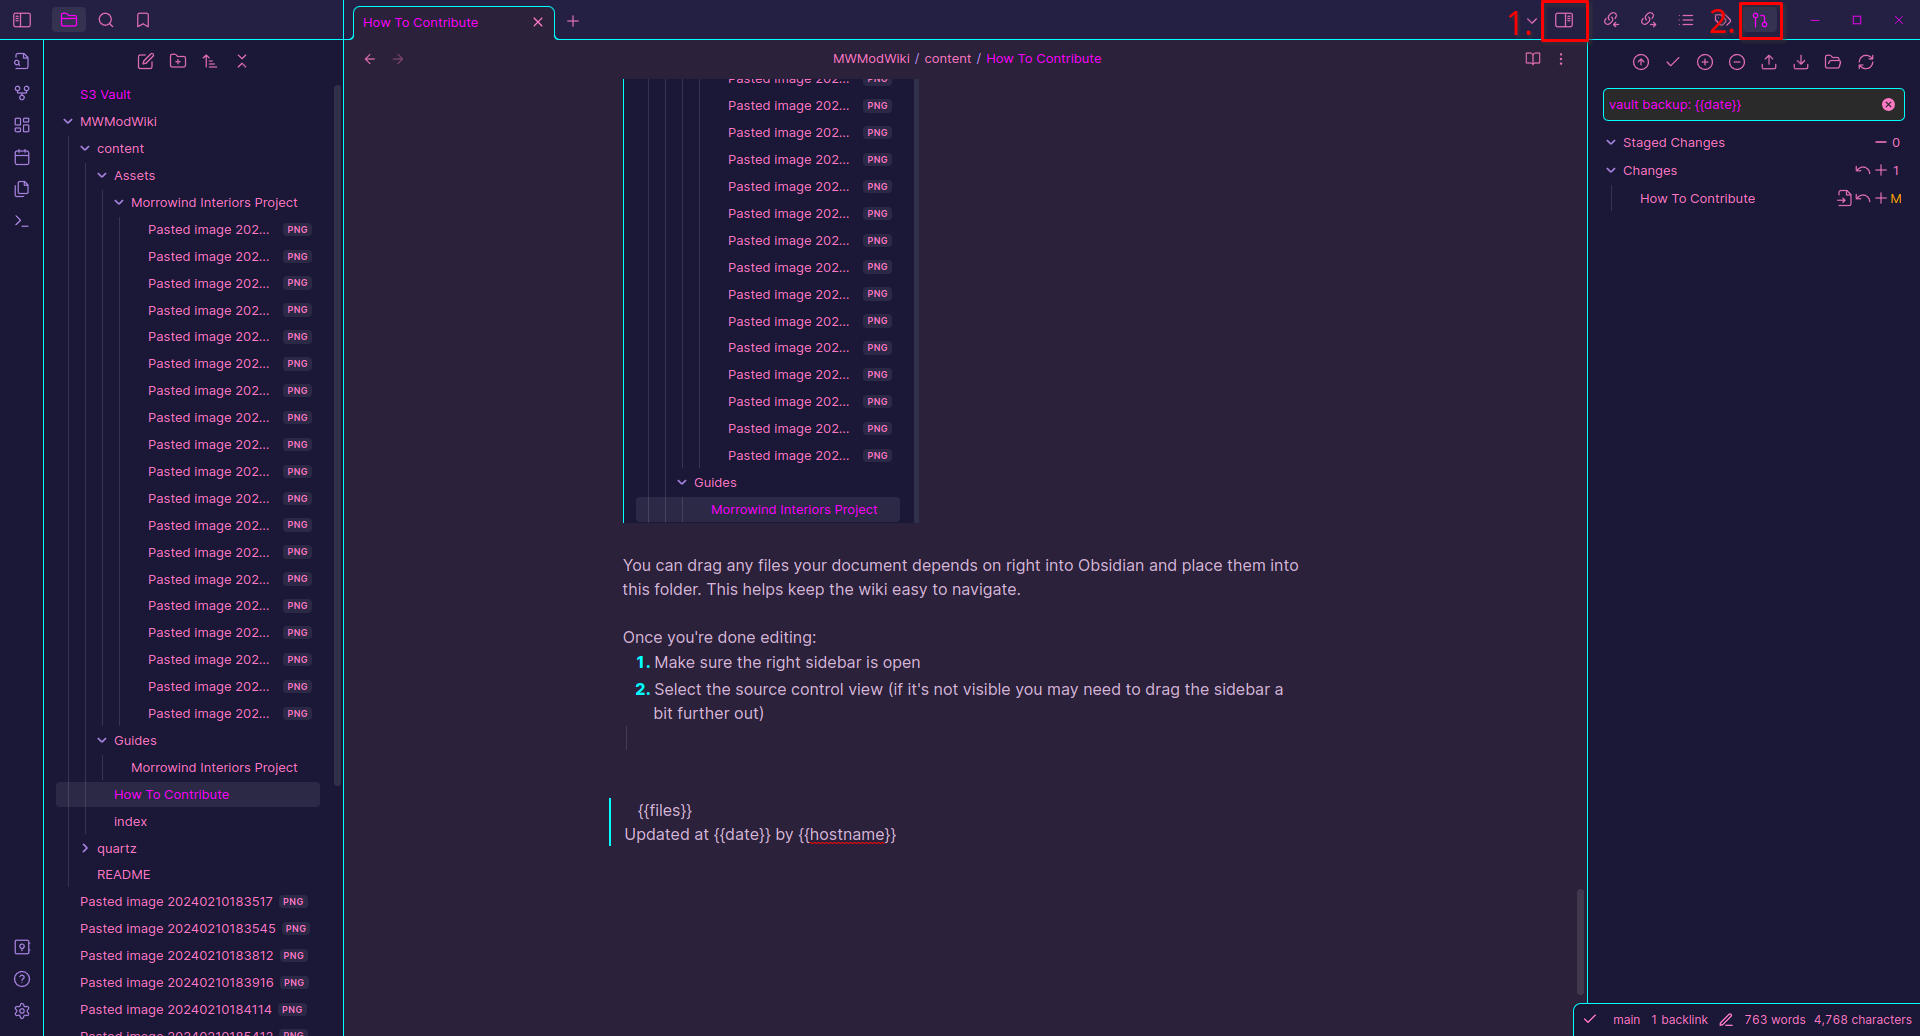
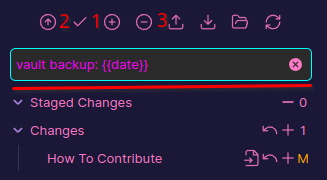
Your changes will be listed here - click the back arrow to revert them, or the plus sign to Stage them. This simply means you are preparing to send them to github. Take this opportunity make sure you recognize everything you added or changed before staging your changes. Mistakes can be made!
This is where your commit message will be written. This is simply meant to be an informative note regarding the changes you made. Once that’s done, click the buttons above in the listed order. Do not click button 1 if you manually staged individual files as described above.
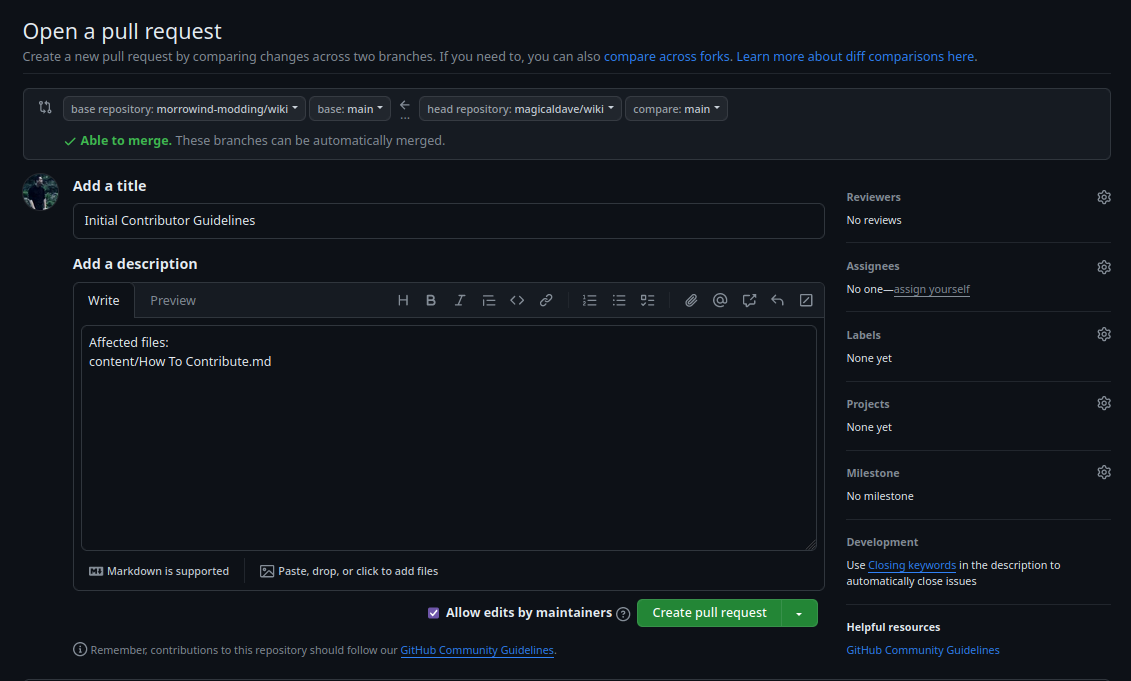
You’re all done editing! The only thing left for you the creator to do is submit it for review. Go back to your fork on GitHub. You should see a message similar to the one below; click Contribute, then Open Pull Request.
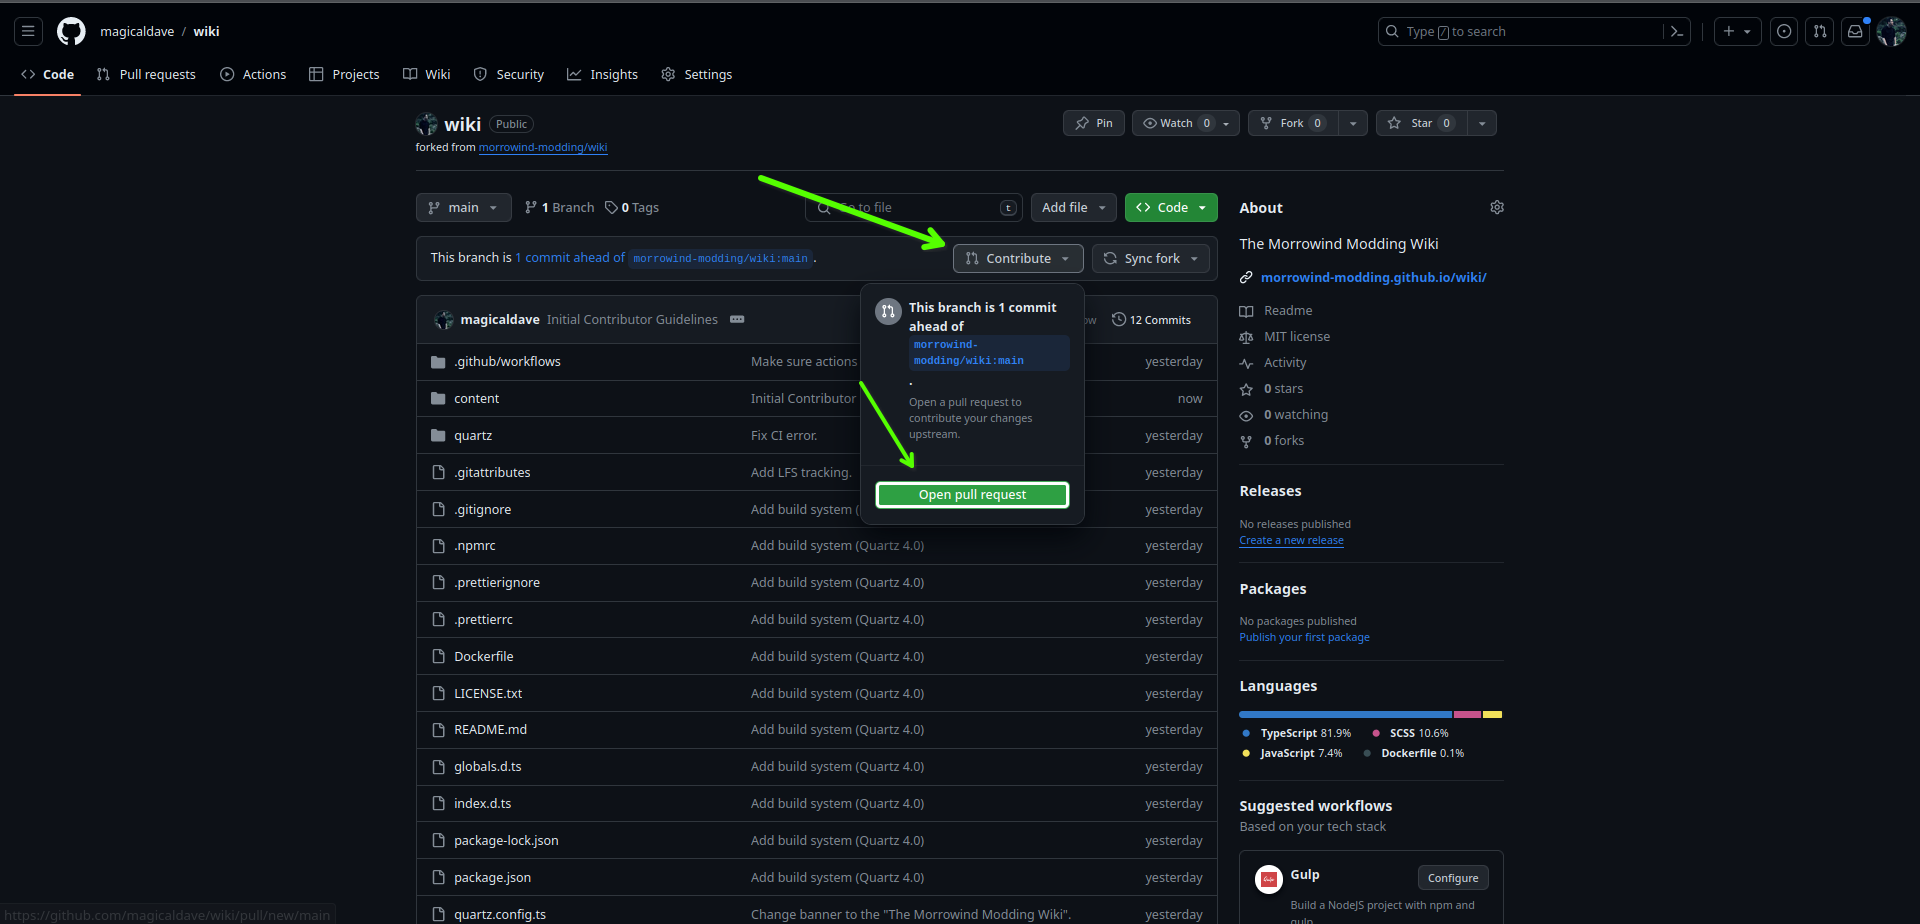
A summary of your changes will appear. If you already know what’s been done, then keep it simple - Just press open pull request. 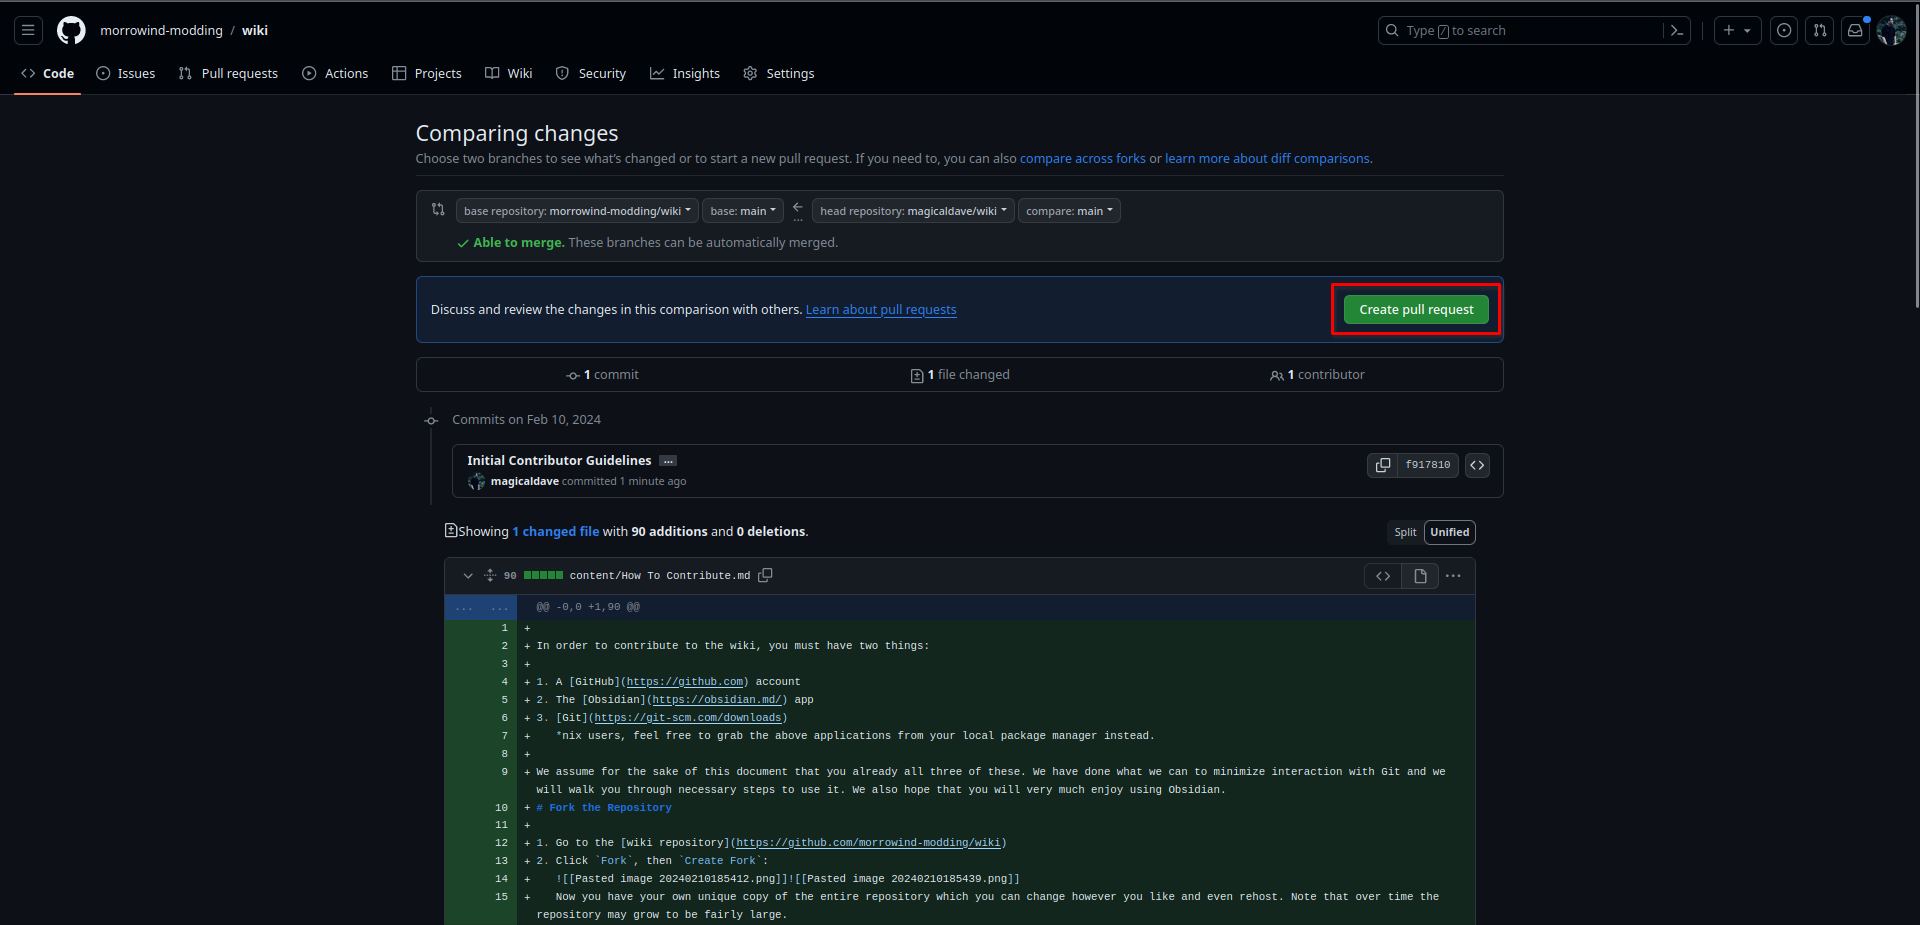
We promise, this is the last page. This is your opportunity to explain your changes, what they do, and why they exist. Don’t be afraid to say whatever you feel is appropriate - be elaborate, be concise, but please explain what you did somehow or another. if you wish, check Allow edits by maintainers, to allow the core team to make changes to your Pull Request whilst it’s being reviewed.
Reviews may be quick or not, but, please do what you are able to communicate with the team regarding any questions or issues that may come up during review. Pull Requests that are abandoned after 30 days will be assumed to be left in the entirely hands of the team and will be handled according to their judgment.
If all goes well, you are now done with the entire process. If you are ever lost regarding any step, you may refer to this document or reach out to the team on MMC
#Gitgettingstarted
